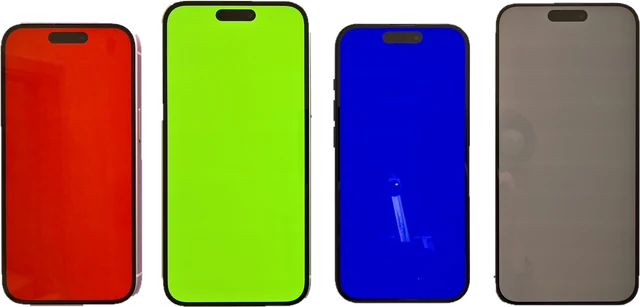
This OLED test fills your screen with the fields people use to judge an OLED TV, monitor, phone or handheld: dark grey uniformity from 5% to 50%, solid colours, near-black steps and a smooth ramp for banding, and a screen burn-in test with guides for where static images usually leave their mark. Press a field and it goes full screen; tap or use the arrow keys to step through. It works on LG, Samsung and Sony OLED TVs, QD-OLED and WOLED monitors, AMOLED phones, the Nintendo Switch OLED and the Steam Deck OLED, in any browser. It is a check with your own eyes, and the page explains what is normal, what is image retention, what is burn-in and how to look after the panel. One honest note: no website can repair burn-in, and this page does not pretend to.
How does an OLED test work?
Every pixel in an OLED makes its own light. That gives perfect blacks, but each sub-pixel also ages on its own as it is used, and small differences between pixels show up as uneven patches. A plain, even field is the easiest way to see them, because there is no picture to hide behind. Dark greys show near-black uniformity, where OLEDs work with very small currents; solid colours show wear in one colour of sub-pixel, often red or blue; and a smooth ramp shows banding, where the steps between brightness levels become visible.
The page uses the browser's Fullscreen API to fill the screen with exact colour values. A grey level is a percentage of the full signal: 5% grey is 5% of 255, which rounds to code value 13 (RGB 13, 13, 13). How bright that looks depends on the transfer curve: browsers use the sRGB curve, and many TVs in movie modes use BT.1886, a plain 2.4 power curve. Both make the dark steps far dimmer than the percentage suggests.
Worked example: how dark is 5% grey?
5% grey is code 13. With the sRGB curve that is 0.40% of full white; on a TV that shows white at 200 nits, about 0.80 nits. With BT.1886 it is only 0.08%, or 0.16 nits. 50% grey (code 128) is 21.6% with sRGB. That is why near-black problems are so hard to spot in normal content but jump out on a 5% field in a dark room.
| Field | Code | Hex | sRGB light | At 200 nit white | BT.1886 light |
|---|---|---|---|---|---|
| 5% grey | 13 | #0d0d0d | 0.40% | 0.8 nits | 0.08% |
| 10% grey | 26 | #1a1a1a | 1.03% | 2.1 nits | 0.42% |
| 15% grey | 38 | #262626 | 1.94% | 3.9 nits | 1.04% |
| 20% grey | 51 | #333333 | 3.31% | 6.6 nits | 2.10% |
| 25% grey | 64 | #404040 | 5.13% | 10.3 nits | 3.62% |
| 30% grey | 77 | #4d4d4d | 7.42% | 14.8 nits | 5.65% |
| 40% grey | 102 | #666666 | 13.29% | 26.6 nits | 11.09% |
| 50% grey | 128 | #808080 | 21.59% | 43.2 nits | 19.13% |
How to test an OLED screen: step by step
Step 1: Prepare the screen
Clean the screen, dim the room, and let the TV, monitor or phone warm up for a few minutes. Turn off auto brightness and any eye comfort or night mode, and use a standard or movie picture mode.
Step 2: Pick a test and press a field
Choose Grey uniformity, Solid colours, Near-black or Burn-in check, then press one of the swatches. It fills the screen.
Step 3: Step through the fields
Tap, click or use the arrow keys for the next field. Move the mouse or tap to see the controls; Escape or Exit closes the test.
Step 4: Look from your normal seat
Look for patches, bands, ghost outlines of a taskbar or logo, and tints. Also look at the screen from a slight angle, where uniformity problems often show more.
Step 5: Photograph anything you find
Take photos at the 20% and 40% grey fields from straight on, with the phone camera at a fixed exposure, to compare later or for a warranty claim.
OLED grey uniformity test: 5%, 10% and 50% grey
Grey uniformity is how even a flat grey looks across the whole screen. Reviewers usually show 5% grey for near-black and 50% grey for mid-tones. On OLED, look for:
- Vertical bands or stripes, a common pattern on large WOLED panels at very dark levels.
- Blotches or a "dirty screen" look: uneven patches, most visible when the camera pans across a flat sky or a sports field.
- A tint shift: one side slightly pink, green or warmer than the other.
- Darker edges or corners.
Some unevenness at 5% grey is normal on almost every OLED and is not a fault. What matters is whether you see it in what you actually watch. At 20% to 50% grey the field should look clean and even.
Gray OLED test: near-black steps and banding
The Near-black tab shows eleven bars from 0% to 10% in 1% steps, the sixteen darkest codes (0 to 15) side by side, and a smooth ramp from black to 25% grey. Every bar should be a little brighter than the one to its left. If several of the first bars look the same as black, the screen is crushing shadow detail: raise the brightness (black level) setting one step at a time. If the bars look blotchy or the ramp shows clear stripes, that is near-black banding or posterisation. Some banding in the ramp comes from 8-bit video and the browser; uneven blotches within one bar come from the panel. For gamma and black level patterns on any screen, use our monitor calibration page.
Screen burn-in test
Burn-in is a ghost of something that was on screen for a very long time: a news ticker, a channel logo, a PC taskbar, a game HUD, a phone's status and navigation bars, or subtitles. It shows as a slightly darker or tinted shape on a plain field. Use the Burn-in check: 20% and 40% grey show it best, red and blue show wear in those sub-pixels, and green and cyan help confirm it. Turn on Guides to see the usual places. A burnt-in area is darker on every colour where those sub-pixels are worn; a shape that only shows on one colour points to that colour's sub-pixels.
Is it image retention or burn-in?
| Image retention | Burn-in | |
|---|---|---|
| What it is | A temporary ghost after a static image | Permanent uneven wear of the sub-pixels |
| How long it lasts | Minutes to hours | For good |
| What clears it | Varied content, or the TV's short pixel refresh in standby | Nothing; a long panel refresh can only even out the edges |
| How to tell | Fades if you watch other content for a while | Still there after days of varied content and a full refresh |
If you see a ghost right after a long gaming session or a paused video, wait. Turn the TV off with the remote (not at the wall) so it can run its short compensation cycle, and check again the next day before you worry.
What does OLED burn-in look like?
Usually like a faint watermark: a darker outline of a logo in a corner, a band along the bottom where a taskbar or ticker sat, a ring where a game's mini-map was, or the shape of a phone keyboard. On a 20% grey field it may look slightly darker or tinted. RTINGS' long-term test of TVs left on for thousands of hours with mixed and static content found that OLEDs showed burn-in with very static content such as news channels, while varied content caused far less; see their real-life burn-in test in the sources.
Can a web page fix burn-in?
No. There are "burn-in fixer" pages and videos that flash colours or show white for hours. Burn-in is uneven wear of the organic material in each sub-pixel: the worn ones are permanently less efficient. Flashing colours cannot restore that. Running full white for hours ages the rest of the panel, which is roughly what a TV's own panel refresh does in a controlled way, and adds wear to the whole screen. Image retention, which is temporary, fades on its own with varied content or the panel's own short refresh. That is why this page has test fields and care advice, and no fixer.
OLED care settings that prevent burn-in
Modern OLEDs have several protections. The names differ by brand, but look for these in the picture or panel care settings:
- Pixel refresh or pixel cleaning: a compensation cycle that runs by itself in standby after a few hours of use. LG calls it Pixel Cleaning, Samsung Pixel Refresh, Sony Panel Refresh. Only run the long manual version if a ghost does not go away, because it also uses up some of the panel's life.
- Pixel or screen shift: moves the whole picture by a few pixels from time to time so edges are not always on the same pixels. Leave it on.
- Logo dimming: lowers the brightness of static logos and HUDs. Leave it on.
- Screen saver and auto power off: on a PC, set a short screen-off time, use a dark or auto-hiding taskbar and move icons occasionally; on a phone, keep auto brightness on and use a short screen timeout.
Keep the screen turned off with the remote rather than at the wall, so the panel can run its standby cycle.
Phone AMOLED burn-in test
Open this page on the phone, turn the brightness up to about two thirds and turn off night mode. Press the 20% grey field, then red and blue. Look at the top (status bar, notch area) and the bottom (navigation bar or gesture line, the keyboard area). On iPhone, Safari cannot put a page in true full screen, so the test fills the browser window instead: scroll so the address bar shrinks, or turn the phone sideways. Phones with an always-on display also wear the clock area.
OLED monitor test for PC: taskbar burn-in
QD-OLED and WOLED monitors sit in front of static desktops all day, so the taskbar, window borders and desktop icons are the usual risks. Run the Burn-in check with Guides on and look along the bottom edge. To prevent it, auto-hide the taskbar, use a dark wallpaper that changes, set a short screen-off time, and let the monitor run its pixel refresh when it asks. For dead and stuck pixels on the same screen, use our dead pixel test.
How to check a used OLED TV, phone or Switch OLED
Bring a phone or ask the seller to open this page on the device. Run 20% and 40% grey and the red and blue fields at normal brightness in a dim room. Look for logo and ticker shapes on a TV, taskbar and window shapes on a monitor, status and navigation bars on a phone, and the game HUD on a handheld. Then check the near-black steps for heavy blotches. Ask how the device was used: a TV that ran news channels all day is the classic burn-in risk.
How to photograph burn-in for a warranty claim
- Use the 20% and 40% grey fields, in a dark room, from straight in front of the screen.
- Lock the phone camera's exposure and focus (press and hold on the screen in most camera apps) so it does not brighten the dark field.
- Take one photo of the whole screen and one close-up of the affected area, plus a photo of the model and serial number label.
- Phone cameras exaggerate unevenness, so describe what you see with your eyes as well.
Why we built this OLED test
Most OLED test pages are a single grey image, a YouTube video that the video compression turns into blocks and bands of its own, or a "burn-in fixer" that promises something no page can do. People checking a new or used OLED need clean fields at known levels, a way to tell image retention from burn-in, and honest advice.
Nitin Raja, who builds this site, tested a lot of these pages before building this one, and kept what people actually need: exact grey levels from 5% to 50%, the colours where wear shows, near-black steps, guides for where burn-in usually sits, and a clear "no" on fixers.
What this OLED test shows
- Grey uniformity: 5% (code 13), 10% (code 26), 15% (code 38), 20% (code 51), 25% (code 64), 30% (code 77), 40% (code 102), 50% (code 128).
- Solid colours: red #ff0000, green #00ff00, blue #0000ff, white #ffffff, cyan #00ffff, magenta #ff00ff, yellow #ffff00, black #000000.
- Near-black: 0 to 10% in 1% steps (codes 0, 3, 5, 8, 10, 13, 15, 18, 20, 23, 26), the codes 0 to 15, and a CSS gradient from black to 25% grey.
- Burn-in check: 20% grey, 40% grey, red, green, blue and cyan, with guides for the status bar, channel logo, game HUD, subtitles and taskbar.
- Safety: the full screen closes itself after 5 minutes without input.
It measures nothing by itself: you judge the screen with your eyes. A browser sends 8-bit sRGB values, and the screen's picture mode, HDR settings, local processing and brightness change what you see. Sources were last checked October 25, 2026.
Why this OLED test is different
- Exact levels, generated by the browser, not compressed video with its own banding.
- All four checks in one place: grey uniformity, colours, near-black and burn-in, with guides.
- Honest about burn-in: retention vs burn-in explained, and no fake fixer.
- Safe by design: nothing fills the screen until you press a field, and a static pattern closes itself.
- No app, no account, works on TVs, monitors, phones and handhelds.
| This OLED test | Typical OLED test video or page | |
|---|---|---|
| Fields | Exact 8-bit values, full screen | Video frames with compression banding |
| Grey levels | 5% to 50%, eight steps | Often one grey |
| Near-black steps | 1% and single-code steps, plus a ramp | Rarely |
| Burn-in guides | Taskbar, logo, HUD, status bar, subtitles | Rarely |
| Burn-in fixer | None: explained why it cannot work | Often promised |
| Static pattern left on | Closes after 5 minutes idle | Stays on |
How accurate is an online OLED test?
- The fields are exact 8-bit values, but the screen's picture mode, HDR, dynamic contrast and brightness settings change how they look. Use a standard or movie mode with dynamic features off.
- Some OLEDs dim a static full screen field after a while (automatic brightness limiting and static image dimming). A slow fade during the test is that protection, not a fault.
- A browser shows SDR fields; HDR highlights and the panel's HDR behaviour are not tested here.
- Your eyes and the room matter: a dark room shows near-black problems that a bright room hides.
- It is a check, not a measurement: it does not give uniformity in percent or a burn-in score.
Sources
Checked on October 25, 2026:
OLED test FAQ
How do I test my OLED for burn-in?
Open the Burn-in check, press the 20% grey field and step through 40% grey, red, green, blue and cyan in a dark room. Look for a ghost of anything that was on screen for a long time: a taskbar, a channel logo, a game HUD or subtitles. Turn on the guides to see where those usually sit.
What is a 5% grey uniformity test?
A full screen of very dark grey (5% of the full signal, RGB 13). On an OLED it shows near-black uniformity: faint blotches, vertical bands or a tint that changes across the screen. Some unevenness at 5% is normal, especially on large panels; it usually is not visible in normal content.
Is it image retention or burn-in?
Image retention is temporary: a faint ghost that fades within minutes to hours, or after the TV runs its short pixel refresh in standby. Burn-in is permanent: the outline is still there after days of varied content and a full panel refresh.
Can a website fix OLED burn-in?
No. Burn-in is uneven wear of the organic material in the sub-pixels, and no colours or flashing patterns on a web page can undo it. Use the screen's own pixel refresh or panel care for image retention; for permanent burn-in, check the warranty.
Does running this test cause burn-in?
Not in a few minutes. Burn-in builds up over hundreds or thousands of hours of the same static image. The test still closes itself after 5 minutes without input so a pattern is never left on by accident.
How do I check a used OLED TV, phone or Switch before buying?
Open this page on it, run the 20% and 40% grey fields and the red and blue fields at normal brightness, and look for outlines of a taskbar, a status bar, a keyboard or a game HUD. On phones, also check the area where the navigation bar and status bar sit.
Why does my OLED look patchy on dark grey?
Small differences between sub-pixels show up most at very dark levels, where the panel works with tiny currents. Mild patchiness or banding at 5% grey is common on OLED panels and is not burn-in. A clear shape that matches something you watch a lot is.
Related tools
 Dead pixel testFull screen colours to spot dead and stuck pixels
 Backlight bleed testSpot backlight bleed and IPS glow on a black screen
 Monitor calibrationGamma, black level, white level and sharpness patternsBlack screenA full black screen, one clickWhite screenA full white screen, one click
 Refresh rate testYour monitor Hz, measured in the browser